DIY Approaches to RAID 10 Recovery
Automatic RAID10 recovery
Since a RAID10 consists of two mirrored RAID0 halves, it is enough to recover the configuration of one of RAID0 arrays
to get the full solution. Earlier, even for automatic RAID10 recovery first you had to pick out RAID0 arrays from RAID10
because RAID recovery software was not capable to do this. However, since then RAID recovery algorithms have been improved
and now you can connect all the available RAID10 member disks to a PC and RAID recovery software does the rest.
The recommended approach to RAID10 recovery is:
- Disconnect disks from the RAID10 – either from a hardware controller or from a NAS.
- Connect the disks to a PC directly. Preferably use SATA ports on the motherboard but USB is also OK.
- Install and launch RAID recovery software. As of 2015, the only free and trusted RAID recovery software is
ReclaiMe Free RAID Recovery, which you can download, from the official web site.
- Select your RAID10 member disks and start the recovery.
The successful RAID10 recovery gives you the configuration parameters such as block size, disk order, the first disk,
start offset. Also you are offered a couple of other output options from creating array image file to extracting data
from the reconstructed array.
All the other DIY RAID10 recovery approaches require you to split RAID10 into two RAID0 arrays.
How to get RAID 0 from the member disks of RAID 10
A typical RAID10 array consists of two identical disk sets (due to mirroring) of RAID0 arrays.
Therefore you should have one full set of disks belonging to RAID 0 before you start the recovery.
To get such a set you need to exclude one disk from each pair.
- The resultant set must contain exactly N/2 disks. If there are less than N/2 disks in the set, the array is unrecoverable.
- If the controller has failed but disks are OK, you can use any one disk from each pair in the set.
- If one of the disks in the pair is mechanically damaged then you should exclude this failed disk.
To determine the disks forming RAID 0, you can use any disk editor tool to analyze and compare the disks contents.
For example you can try WinHex or ZAR.
The demo version of either will do.
When using such a tool, pay attention to the disk names and to how these names correlate to the real devices.
For this you need to take into account the following:
In the Disk Management (right click on the Computer - Manage - Disk Management) disks are displayed as Disk 0, Disk 1 and so on.
In various tools you can meet different names, like \\.\PhysicalDrive 0 (in R-Studio) or HD0: (in WinHex) or Disk 0 - Model
(in ZAR data recovery software).
| Disk Management | R-Studio | WinHex | ZAR |
|---|
| Disk 0 | \\.\PhysicalDrive0 | HD0: | Disk 0 - [Model Name] |
| Disk 1 | \\.\PhysicalDrive1 | HD1: | Disk 1 - [Model Name] |
| Disk 2 | \\.\PhysicalDrive2 | HD2: | Disk 2 - [Model Name] |
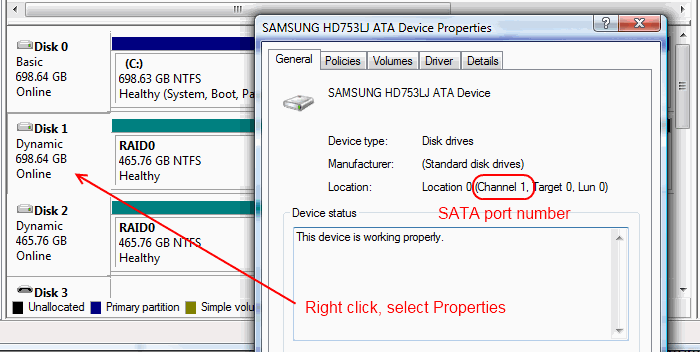
To get the actual port number, see the detailed information on the device in the Disk Management (right click on the disk - select Properties).

For SATA disks you need to know a number of physical port on the motherboard (see Location Channel)
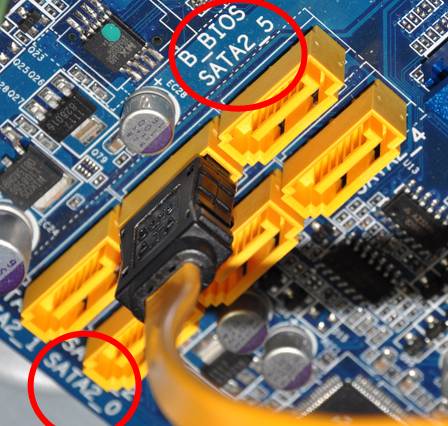
and then compare with a port number printed on the motherboard (typically, all the ports are labeled).

In the photo above, two SATA port labels, Port 0 and Port 5 are clearly visible; also, one can make out parts of labels for ports 1 and 4.
The cable is plugged into port 3.
As a last resort there is always the option of connecting the disks one by one.
Once you pick up the RAID0 from the RAID10, you need to recover the RAID parameters. Read more about
how to recover RAID 0 manually.
Controller failure
If your hardware RAID controller has failed and you are looking for a way to assemble the array without the RAID recovery step,
you can try to connect the disks to the identical controller.
Most if not all modern controllers store array configuration on the array disks themselves.
In routine operations, this allows arrays to be moved between identical controllers without losing data.
When something fails, the same feature allows replacement controller to pick up the old array.
Furthermore, later-model controllers are often compatible with the configuration records of previous models of the same vendor and product line.
For example, Intel ICH10R chipset controllers do read previous version (ICH9R) arrays.
In a typical NAS, there is no hardware RAID controller.
The RAID is instead implemented in software, most often using Linux md-raid module.
If you have a RAID 10 array in a NAS device, try using Linux as described on the
manual NAS recovery page.
However, it is recommended to create disk image files first to prevent the data loss situation if you accidentally mix up the disks.
If the controller initializes the array based on this wrong disk order, you lose exactly half of the array data.
If you cannot use an identical controller or you accidentally deleted your array and it is not accessible despite the controller is fine,
you need to disconnect disks from the failed controller, connect the disks to a PC separately, and start automatic RAID10 recovery as described above.
|